以下文字转自:
http://linuxandfriends.com/2009/03/05/install-linux-on-a-usb-stick-in-5-easy-steps/
还有一篇文字参考:
http://tuxradar.com/content/how-install-linux-usb-flash-drive
Install Linux on a USB Stick in 5 Easy Steps
This
tutorial
explains how you can easily install Linux on a USB stick in 5 simple steps. Using this method, it is possible to install any
Linux
distribution of your choice on a USB stick. Nowadays, it is quite cheap to buy a 4GB or 8GB USB memory stick and they are widely available in the market. This makes it an exciting proposition to install and boot Linux from a USB stick.
Pre-requisites for installing Linux on a USB stick
You will need the following before you start installing Linux on a USB stick.
- A USB memory stick of at least 4 GB size. If you intend to install a tiny Linux distribution such as “Damn Small Linux” which is of 50 MB size, or “Puppy Linux” (90 MB) then you can manage with a USB memory stick of smaller size say 512 MB.
- Download the Linux distribution ISO of your choice and save it in a location on your hard disk. This is not mandatory but it will help you save time. And …
- Lastly, you have to download the utility
UNetbootin which is going to do all the hard
work
of installing the Linux distribution on your USB stick. UNetbootin utility is available for Windows and Linux, with specific packages created for Ubuntu, Debian, OpenSUSE and Gentoo Linux. If you are using any one of the 4 Linux distributions, then you can
install UNetbootin via their respective package management software.
If all three of the above mentioned pre-requisites are met, then we can start the installation process.
Installing Linux on a USB stick
The following steps explain how to install Damn Small Linux on a USB memory stick. The steps are the same for all other Linux distributions.
First run the UNetbootin utility. It opens a GUI window where you have to set a number of parameters. UNetbootin provides 3 options to
install
Linux on your USB stick. They are :
- Distribution – where you choose your Linux distribution and its version from the drop down menus. And when you give the go ahead to install it on the USB stick, UNetbootin will download the respective Linux distribution from the net. This
option can be used if you have a very fast Internet connection. - Disk image – If you already have a downloaded Linux ISO, you can choose this option. And lastly,
- Custom – allows you to choose your own custom Linux kernel and Initrd and set special options.
The 5 step install
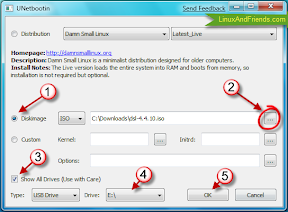
These are the steps I followed to install DSL on my USB stick. Watch the following screenshot and read the corresponding steps to understand them.
- Select “Disk image” option.
- Enter the absolute path where you have stored your Linux ISO. You can do that by clicking on the button at the extreme right.
- Check the option – “Show All Drives”.
- Select the drive from the drop down
menu.
The drive you have to select is the one associated with your USB stick. In this case it was E:. You may have a different
drive
letter associated with your USB stick. If you use the wrong drive, this tool can erase all your data. So
use with care. - Click “OK” button to start the installation process.
In a few minutes time, UNetbootin will finish the installation and will ask you to reboot your machine.
After rebooting, select the USB boot option in the BIOS
boot
menu.
Hint: Press the “F2″ Function key on your keyboard to access the BIOS screen.
Now you are ready to boot your new Linux installation straight from your USB stick.
版权所有,禁止转载. 如需转载,请先征得博主的同意,并且表明文章出处,否则按侵权处理.


